Upload a Job to PrinterMon Manually
Upload a G-code or 3MF file to PrinterMon's library. Optionally assign it to one or more printers (or to a group) so it lands in the Active Job slot of those printers. Most users will get files into PrinterMon automatically via their slicer (see Connect Your Slicer), but manual upload is the fallback for anything outside that path.
Supported formats
- .gcode, .g, .gco — plain G-code from any slicer.
- .3mf — Bambu Studio / Orca / Prusa packaged format. PrinterMon parses the embedded G-code and the metadata bundle.
PrinterMon parses the file on upload to extract: slicer, printer profile, filament type and name, nozzle diameter, print time, total layers, max Z, layer height, nozzle/bed/chamber temps, infill, support, and filament usage in grams and metres.
Step 1. Open the Upload Print File dialog
Upload Print File
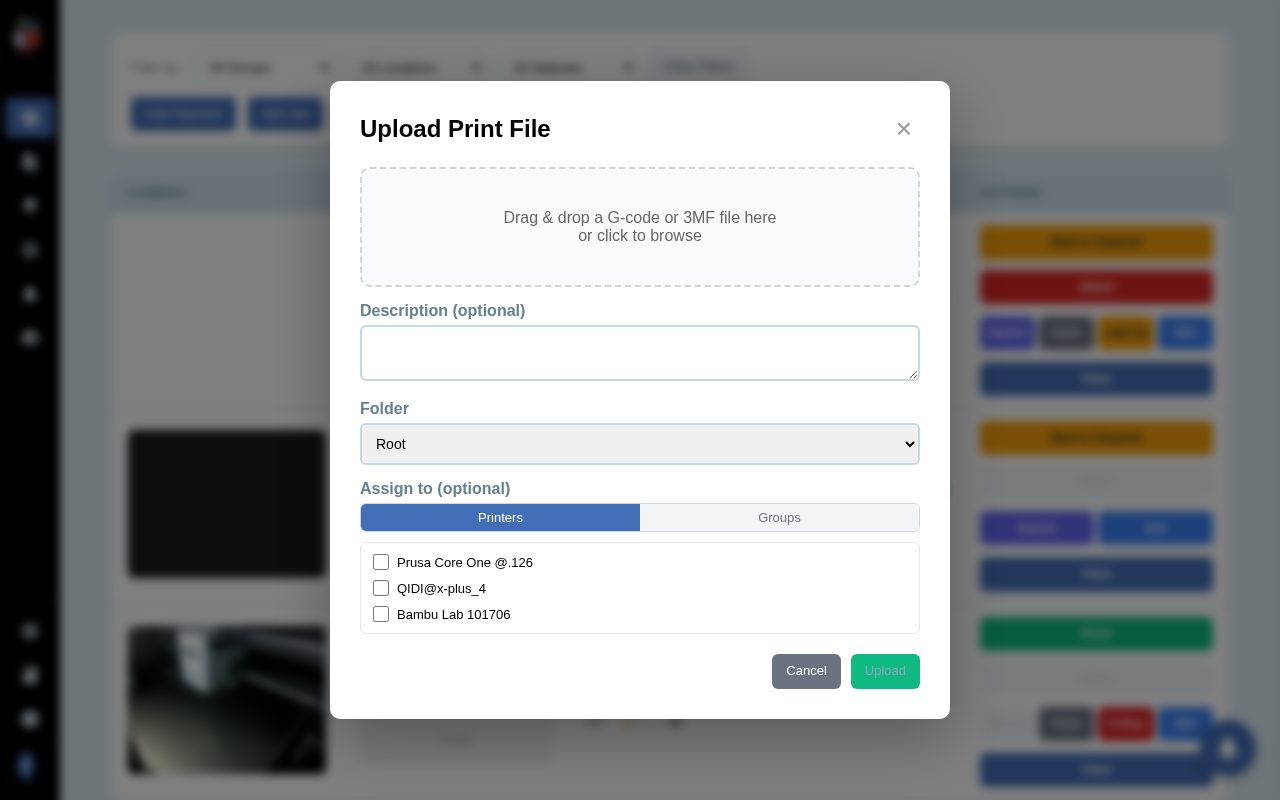
Two equivalent entry points: click Add Job in the top toolbar of the Dashboard, or click Upload File in the toolbar of the File Library page. Both open the same dialog.
Step 2. Pick the file
Drag and drop a .gcode, .g, .gco, or .3mf file into the drop zone, or click the zone to browse. PrinterMon sends the file to a preview endpoint and displays a thumbnail (if one is embedded), the filename, file size, print time estimate, and filament usage. If parsing fails, the file is rejected before upload.
Step 3. Set destination and assignments
- Description. Optional free-text notes shown in the library row.
- Folder. Where to file the job in the library. Defaults to Root. Create new folders from the library page (New Folder button).
- Assign to. Two sub-tabs:
- Printers. List of every printer on the node, each with a checkbox. Tick one or more to assign the file as their Active Job.
- Groups. List of printer groups. Tick a group to assign to every printer in it at once.
Assigning is optional. Leave everything unticked to upload to the library without dispatching.
Step 4. Upload
Click Upload. PrinterMon streams the file to the server, runs full parse, stores it in the library, and writes the assignments. The dialog closes. The new file appears in the File Library, and any assigned printer's row on the dashboard now shows the filename in its Active Job column with a green Print button in Actions.
What you can do next
- Click Print on the printer row to start the job. See Starting a Print from the Dashboard.
- Open the library to manage, rename, lock, or delete the file. See File Library Actions.
- Reassign the file to a different printer at any time from the library row's Print (▶) button, which opens a per-file printer picker.